Best Spring Hikes in Colorado

There is no better way to celebrate the coming of spring than to spend time outdoors in the warming weather. Some of the best hiking trails in Colorado are made even better by the beautiful wildflowers. Seeing these colorful blooms will get you pumped about the new season and all the spring activities around Colorado Springs. Here are a few of our top spring hikes in Colorado.

Canyon Loop Trail at Deer Creek Canyon Park

Length: 3 miles

Difficulty: Easy

Address: 13388 Grizzly Dr, Littleton, CO 80127

Trail Map: here 

Just outside Littleton, Colorado – an easy drive from Colorado Springs – is Deer Creek Canyon Park. This space is great for an easy day hike, and it gets vivid colors during the spring and summer. It is tucked neatly into the foothills, providing both nice views of the surrounding mountains and some peace and quiet from nearby civilization.

You can hike a loop via the Meadowlark and Plymouth Creek Trails and enjoy excellent views from the mild 500-foot elevation gain. Meadowlark is a hiker-only trail, but Plymouth Creek does allow bikers. Just keep this in mind as you explore. You can extend the hike by continuing up Plymouth Creek Trail, though you will have to turn back at some point, and you may find it a steeper incline. 


South Mesa Trail at Boulder Open Space

Length: 4.4 miles

Difficulty: Easy to Moderate

Address: 3633 Eldorado Springs Dr, Boulder, CO 80303

Trail Map: here 

This hike is short in mileage but does manage nearly 800 feet of elevation gain, making it a slightly harder easy hike. The benefit of this is that you will get up well into the foothills and earn sweeping views of the surrounding plains. In the spring and summer, the area is covered with vivid Colorado wildflowers. There are also excellent views of the nearby Bear Peak, South Boulder Peak, and El Dorado Mountain.

To hike here, there is a parking lot right at the trailhead and another across the street for the Doudy Draw Trailhead if it gets crowded. If you want to extend the hike, Shadow Canyon is a great way to get in a tough workout and walk the saddle between Bear and South Boulder Peaks. This is a beautiful trip that will excite any nature lovers. While this is a 90-minute drive from downtown Colorado Springs, you will find it an excellent day trip to make in the spring. This is one of the best spring hikes in Colorado thanks to astounding views and colorful, unspoiled land. 

Spruce Mountain Trail at Spruce Mountain Open Space

Length: 5.5 miles

Difficulty: Moderate

Address: 13415 Spruce Mountain Road, Larkspur, CO 80118

Trail Map: here 

Spruce Mountain Open Space offers a beautiful wooded hike that summits to a flat top. The trail is moderate in difficulty, in large part due to the 600 feet in elevation. At the top, you will be rewarded with gorgeous views of Pikes Peak, the Palmer Divide, and the surrounding area as well as the pride of completing a challenging ascent. Between the natural limestone formations and the pine and fir forests, this park easily makes any list of the best hiking trails in Colorado. It is made even better by the explosion of foliage and wildflowers in the spring, so don’t miss this one.

This is a quick trip up from Colorado Springs, just north of Palmer Lake. Keep in mind that horseback riding and mountain biking are both allowed on the Spruce Mountain Trail, so be sure to follow proper trail etiquette on your hike. The park has toilets and water and allows dogs on leashes. It is also a great place to see wildlife near Colorado Springs. All in all, it makes for a great day hike and an excellent way to ring in the coming of some warmer months.

Carpenter Peak Trail at Roxborough State Park

Length: 6.5 miles

Difficulty: Moderate to Hard

Address: Parking Lot, Roxborough Park, CO 80125

Trail Map: here

Roxborough State Park is a gorgeous 4,000-acre park northwest of Colorado Springs. It is home to a range of wildlife, including a variety of species for birdwatchers, and beautiful explosions of foliage. You can access the park via East Roxborough Drive, and you will find a series of parking lots along with restrooms and the trailhead for Fountain Valley Overlook. A short walk south on Willow Creek Loop and you will intersect with Carpenter Peak Trail.

The Carpenter Peak Trail is a great medium selection in this park which has nearly 14 miles of hiking trails in total. This trail can be a bit steep at times and definitely falls within moderate difficulty for the top spring hikes in Colorado. It covers about 1,000 feet of elevation gain and includes amazing panoramic views at the summit. From the highest point of the park, you will be able to enjoy outstanding views of Denver to the northeast and Pike National Forest. 

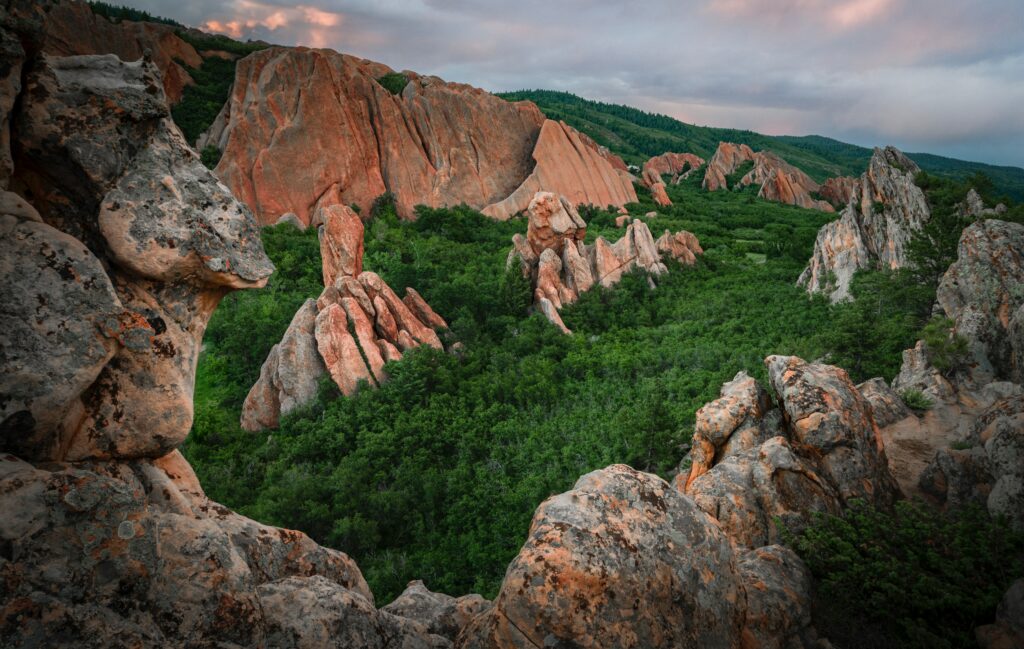
Red Rock, Lion, Section 16 Loop at Red Rock Canyon Open Space

Length: 11 miles

Difficulty: Hard

Address: 530 S 31st St, Colorado Springs, CO 80904

Trail Map: here 

Red Rock Canyon Open Space is a popular place year-round for Colorado Springs residents and tourists alike. It features iconic red rock formations, parallel ridges, eroded canyons, a quarry, and more. There is no shortage of wildlife and interesting geology to spot at any time of year. However, it is an extra treat in the spring and summer as it is home to a variety of colorful wildflowers. You can practice your wildflower identification here, where you will be sure to spot Indian Paintbrush, Rocky Mountain Bee Plant, and more. 

For an easier version of this hike, you can skip Manitou Section 16 and do a shorter loop just around Red Rock and Lion trails. This 3-mile hike is rated as moderate and still provides excellent views of the surrounding landscape. For either of these options, you will want to park at the most southern of the three lots, off S 31st Street, which is listed as parking for Red Rock Loop. No matter which trail you choose, you will undoubtedly have a great experience as the whole park houses some of the best hiking trails in Colorado.

Final Thoughts

Colorado Springs is chock-full of amazing hikes and opportunities for outdoor adventure. Once you hang up your snowshoes or skis, it is time to get out the hiking boots. If you are just getting started, you should check out an easy, half-day guided hike. Otherwise, learn how to pack for a day hike, grab a map, and hit the trails. Happy hiking!

How to Layer for Fall Hiking in Colorado

If you are a big hiker or nature enthusiast, you know that fall is arguably the best season for hiking. The energizing nip of crisp air on your face, the colorful foliage as nature buckles down for winter – personally, it’s my favorite time of year. If you are hoping to enjoy fall hiking here in Colorado, you certainly need to know how to layer for hiking. These tips on proper layering techniques will help ensure you are prepared for the weather you might encounter on a fall hike in the beautiful Rocky Mountains.

The Principles of Layering for Colorado’s Fall Weather

The first thing to know is that the term ‘layering’ doesn’t mean just wearing more and more clothes. In order to brave the elements and stay comfortable and safe, you need to wear the proper clothes in the proper order. First, the base layer serves to keep you dry when you sweat. Next, the middle layer is insulating to help retain body heat in Colorado’s colder weather. Finally, the outer layer protects against the harsher conditions you may experience on a fall hike.

We’ll start at the base layer and work our way out, so you understand what fabrics are best for each layer. We’ll also learn how to layer for the specifics of fall weather in Colorado and the hikes you are planning. As you likely know, fall in Colorado can range from warm to very cold. The weather can change quickly, and conditions can worsen with no warning. Especially if you are hiking to a higher elevation, say summiting one of the state’s many fourteeners, you will find temperatures and precipitation requiring a much different outfit than what you had on in the parking lot. It’s important to dress and pack well, as you will learn.

Image by David Mark from Pixabay

The Wicking Base Layer 

You can think of the base layer as the clothing that touches your skin. This is more than just a t-shirt and shorts or a long-sleeved shirt and long underwear. Remember that the base layer also includes underwear (boxers, briefs, bras, and more) and socks.

The main goal of the base layer is to wick away moisture and keep your skin dry. As you know, sweat cools you down, stealing your body heat much faster than a cold breeze. In the hot summer, you may not mind a cotton shirt absorbing and holding your sweat. In the fall and winter, though, cotton is at the top of the “Absolutely Not” list. Seriously, it’s one of the most important hiking safety tips of all time.

Photo by Stephen Leonardi on Unsplash

The Best Base Layer Materials

The best synthetic fabrics for base layers are polyester and nylon. You likely have these in your closet as your running or exercise clothes. You can go by personal preference, as long as it is ‘moisture-wicking,’ ‘dry-fit,’ or the like. Again, make sure your bras and boxers meet these criteria, too. A great natural fabric, especially for socks, is wool, as it wicks moisture and provides great heat retention. Wool is good for clothing, too, if you are in colder temperatures or hiking Colorado’s many mountains. It will keep you warm without being too heavy, but it also is more expensive than synthetic fabrics.

There are a few different options in terms of the weights of base layers, and you can decide based on the time of year and anticipated weather. No matter what you choose, your base layer should always be moisture-wicking. This layer should also fit snugly against your skin. You don’t want gaps between your skin and the material as it won’t be able to wick sweat away as effectively. A tight but comfortable base layer will keep your skin dry, which in turn will keep you warm and prevent skin irritation, like chafing and blisters.

Base Layering Tips for Colorado’s Fall Weather

Base layers are organized by weight; lightweight or ultra-lightweight for hotter weather and midweight or heavyweight for the colder months. This might mean shorts and a t-shirt in early fall when Colorado temperatures are in the 50s or 60s, and long johns and long-sleeved shirts in late fall when it’ll be in the 30s and 40s on average. Because the weather can change quickly here, especially in the mountains, I prefer to keep my base layer light and carry a heavier middle layer in my day pack.

Remember, the goal of this layer is moisture-wicking, where warmth is the job of the middle layer. That’s why lighter base layers make sense in Colorado’s fall conditions. You can always add more clothes later if the temperature drops up the mountain. The one exception to this is socks. My feet always run cold, so I highly recommend a thick wool sock for fall hikes, ones that cover your ankles! As long as your hiking boots are breathable, your feet will be happily dry and warm.

The Insulating Middle Layer

Next up, it is the job of the middle layer to retain body heat and keep you warm in colder temperatures. Where base layers tend to be stretchy and thin, you’ll recognize your middle layer pieces by their soft and puffy qualities. When shopping, you may see middle layer options listed as ‘soft shells.’ Depending on the weather, you can choose a lighter or heavier option, so it’s a good idea to have multiple middle layer pieces if you are planning on frequent fall hikes in Colorado. 

Photo by lucas Favre on Unsplash

Middle Layer Options for Fall in Colorado

For lighter wear, you might go with a microfleece pullover or hoodie. Fleece is nice because it dries quickly and stays warm. It is also breathable so that you won’t overheat. This is a great option for the early fall in Colorado. However, if it’s windy, you will definitely need an outer shell, or you’ll find the breathability a weakness.

For the colder days, a down jacket is the best middle layer. I am partial to synthetic down, both for the animals and the water resistance. Down insulated jackets don’t hold up well when wet, but they compress better than synthetic down if you need to save space in your pack. If a softshell is all you plan on wearing, I’d recommend one with a hood, so your neck stays warm. In this case, though, you will definitely need to pack a waterproof outer shell, as the fall in Colorado sees rain or snow regularly.

The Defending Outer Layer

Once you’ve got the dry and warm inner layers set, the last part of knowing how to layer for hiking is protecting against the elements. Fall in Colorado can be all over the map in terms of weather conditions, and this outer shell is key for making sure the wind, rain, and snow don’t penetrate and leave you cold and miserable.

Photo by Daniel Lincoln on Unsplash

The Best Outer Layers for Colorado’s Fall Season

For both jackets and pants, you will want waterproof outerwear. Trust me when I say that “water-resistant” is not good enough! If you get caught in a downpour, a water-resistant layer is going to soak and leave you shivering. Also, be sure it has a hood. Rain dripping down your neck and back is truly an uncomfortable and dangerous way to spend a hike.

In addition to water- and wind-proof material, your outer layer should also be breathable. These pieces are more expensive, but if you plan on exploring Colorado’s fall hikes, this feature is a must. Breathable jackets, ones with zippers in the armpits and such, are key for longer hikes because they keep you dry while you work hard. If the inner layers are wicking away moisture, but your outer layer isn’t breathable, the moisture will condense against it and soak your middle layer. You need breathability to allow fresh air to move through and clear out the humidity. 

One final feature of a good outer layer is durability. Since this layer has to brave the elements, you want something that will stand up to a bit of a beating, especially for pants that you’ll sit on, trek through the brush, and more. If your outer layer gets torn, you’ll have leaks when it rains. And with the expensive nature of these clothes, you want to make sure to buy something that is a good investment.

Packing for a Fall Hike in the Rockies

Now that you know the options for layering clothes, let’s talk about how to pack for day hiking in Colorado. Seasoned hikers are always carrying day packs, and it’s not just for the granola bars. 

When you start at the trailhead, you might be in your base layer and outer shell. Mid-fall in Colorado is comfortable, and you might reason that it’ll only be a few hours. But as you hike up the mountain, the weather changes. It will get colder and windier the higher you go, with less protection from surrounding trees. You may even get an unexpected shower or snow flurry. 

Before you leave, always check the weather to know what to expect. Then, pack that insulating middle layer anyway. A light fleece or down jacket won’t take up much room or add much weight, and you will be glad you have it when you need it. Wearing appropriate clothing and knowing how to layer for hiking will keep you comfortable and protected during your hike so you can enjoy mother nature, no matter what weather she brings.

How to Pack for a Day Hike in Colorado

The variety of terrain and difficulty found on day hikes requires the skill of adequately packing. 

How to pack for a day hike is a skill that many have been working towards mastering for years and that all hikers need to know the basics of. Before you head out into the backcountry, your pre-trip will always require you to take a look at all of your hiking essentials. 

Day hikes in Colorado Springs can be laid back or some of the more strenuous hikes out there. To take these hikes on safely, you need to pack efficiently and effectively. While optimism and a positive mental attitude should be the first thing you pack, you can’t forget that emergencies do happen. If they happen to you, what’s inside your day pack will often determine how the situation plays out. 

If you’re new to hiking or have never hiked in Colorado before, we recommend booking a hike with a guide. Guided hiking tours will help you feel confident in a new environment and help lower risk while hiking in the mountains.

10 Essentials to pack for a day hike

The Ten Essentials are a great place to start when learning how to pack for a day hike. These were created over 80 years ago and have been modified as our technology and knowledge advance.

To begin, we’ll take a quick look at each of the ten essentials.

1. Navigation

Before you head out, you’ll need to know where you’re going and how to get there.

A map and compass are an excellent pick for navigational aids, but you can up your technology game and bring along any satellite navigation and communication devices. 

2. Sun Protection

The sun will quickly ruin your day hike and potentially lead to more serious problems if you’re unprepared.

If you adequately protect yourself with the proper layers, hats, and sunscreen, you are much less likely to experience heatstroke, dehydration, or any other sun-related illnesses. Even on cloudy days and in the winter, the UV rays can still reach you, so always be prepared!

3. Insulation

If you’re packing for a long day hike or even packing to prepare for potential hazards, extra layers will be key to keeping you safe and comfortable.

The weather flips like a switch in some environments, especially in the mountains. With the proper jackets, hats, and rain shells, you can be ready to take on anything mother nature throws at you. 

4. Illumination

Any day hike can turn into an overnighter if you lose the trail or get turned around unexpectedly (especially if you neglect navigation).

Pack a headlamp or flashlight with spare batteries, so you don’t need to shuffle your way through the dark. 

5. First-Aid

There’s no need for a complicated first aid kid unless you are a professional, but it’s important to have a basic kit ready for any injuries you or other hikers may have.

Remember, not all kits are made for all environments. Buy a basic kit and make changes to it to fit your experience level and the needs of your group. 

6. Fire

Being ready for anything means being prepared to keep yourself warm, cook food, and treat water when in the backcountry.

Fire starting supplies such as waterproof matches, a lighter, or a Ferro rod are great options to help get a fire anywhere. Pick what you are the most comfortable with and pack a spare.

7. Repair kit and tools

Packing a repair kit can seem like overpacking when you’re planning on just going out for the day, but it can be one of the most important things you bring along.

You will find more uses for duct tape and a knife than you ever thought imaginable when you need it out there. 

8. Nutrition

Every day of our lives appears to be driven by, “what meal will we have next?”

When you go out into the backcountry, this question is asked even more frequently as your body works harder than normal to bring you from place to place. Even if you bring out just a few calorie-dense snacks on your day hike, you’ll be grateful. The best practice is to bring at least an extra day’s worth of calories.

9. Hydration

No matter if you’re out in the dead of winter or on one of the guided hiking tours in Colorado Springs during the hottest day of the year, water is always your best friend.

Water keeps you warm in the winter and cools in the summer. Almost every ailment you start experiencing in the backcountry comes with the initial treatment recommendation of “drink some water.” Unsurprisingly, it usually works. 

10. Emergency Shelter

Going out means going out ready for your trip plans to change drastically. In most cases, you’ll never end up spending a night out that was unplanned.

However, if you ever find yourself in that situation, an emergency shelter will be a lifesaver. This can be a small bivy (like a one-person waterproof cocoon) or simply a tarp to protect yourself from the elements. 

More about comfort, less about survival

The Right Pack

The right backpack for day hiking is going to be a complete game-changer when you’re out hiking. A comfortable bag with enough space and support will turn a miserable experience into a walk in the park. For starters, I recommend buying a 30-40 liter pack if you are focused on day hikes.

40-liter packs can be used for short overnight trips but aren’t overkill for just a day. 

Do some research on different packs that give you the back support you need. Certain brands like Osprey will form-fit each pack to your back. This can be helpful, especially if you have a history of back problems. 

Don’t let not having the perfect day hiking pack stop you though! Start with the bag you have and upgrade when you’re ready.

The Right Shoes

Nobody wears flip-flops to the prom, and nobody should wear high heels out on the trail. The right shoes for you will be shoes that are comfortable, sturdy, broken in, and give you good ankle support. After those basics, you can begin looking at the different styles of rubber, traction designs, and waterproof construction.

Wearing the right shoes helps to avoid blisters, which means you won’t need to break into your first aid kit. The more preventative measures you can take to save on supplies will leave you even more prepared for your next day hike. 

How to Pack for a Day Hike

Now that we’ve hit the basics of what you need to pack, it’s important to talk about the process of packing.

The ABCs

The ABCs are a valuable tool for packing a backpack so that it fits comfortably and makes hiking easier. While most people will only use this method with multi-day trips, it’s helpful to consider when you are doing day hikes as well. Like I mentioned earlier, some day hikes in Colorado Springs can push you to your limit. Packing a comfortable bag will take a lot of strain off your back and make these hikes more enjoyable.

Accessibility- When you’re packing, make sure things you’ll need while hiking are packed on top or in an external pocket that you can easily get to. This includes things like rain gear, snacks, and especially a headlamp. Looking for a headlamp without a headlamp can be the most frustrating thing you’ll do all year long. 

Balance- Having a bag that pulls you to one side will end with a cranked back and one leg that takes on a lot more stress throughout the day. The key is to make your pack well-balanced to maximize comfort. The weight should be evenly distributed from side to side, and you want the majority of the weight to be in the bottom third of your bag. 

Compression- Here’s what can save you after packing a long list of essentials to bring on any day hike. Gear that compresses down into a small pouch is the best gear for hiking. After all, you don’t need to buy an 80-liter pack to go out for the day. Invest in a few compression bags to squeeze everything down into a small space. 

Know your Environment

You need to know what kind of a hike you are headed into and what that environment may throw at you. This means looking at the current weather forecast, the weather trends for your location, and reviews of the hike from recent days. 

You can gather information from apps (like AllTrails), with hikers going out onto these trails every day. If one person notices a dried-up river where most hikers rely on water, you wouldn’t know this without their comment. Utilize social platforms to gather as much information as you can before heading out. 

This information will help you greatly when packing your bag. It will tell you if you need extra socks because everything is muddy and wet or if you need to bring a down jacket for when you get up above 11,000 feet of elevation.

If you’re uncertain about reading this information and transferring it into packing, don’t hesitate to reach out for guided trips in Colorado Springs. These are fantastic resources when first learning how to be comfortable in the backcountry.