image of rock climbing gear

Rock Climbing Gear – A Beginner’s Guide

Rock climbing has had an explosion of growth over the last couple of decades. The unique sport offers excitement, a challenge for all abilities, and different ways to explore and play in both indoor and outdoor spaces. Sometimes a new sport can be intimidating: the gear, systems, and language can be a lot to learn. If you are uncertain about what comes first, it can be helpful to research and learn more about how to get into rock climbing

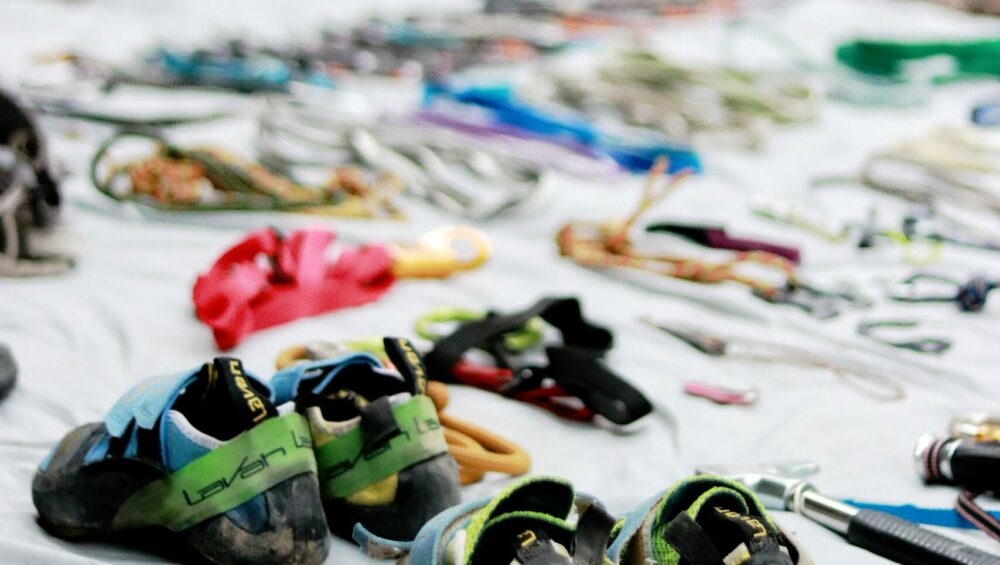
As a beginner rock climber, consider familiarizing yourself with the sport through a guided rock climbing tour. Guided excursions come with all the gear you will need and allow you to get comfortable with proper climbing gear use. If you have never climbed before or want to upgrade from rental gear, this rock climbing gear list has all the beginner climbing essentials you need to start your journey into the vertical world.

Rock Climbing Shoes

Rock climbing shoes are an important part of climbing. The special rubber sole and snug shape allow you to grip the rock, offer protection for your feet, and give you the ability to place your feet on small holds. There are various shoes for all styles of climbing, and climbing shoes can be organized into the following categories: neutral “flat” sole, moderate “slightly downturned” sole, aggressive “very downturned” sole. Many shoes also offer options of “slip-on,” laced, or velcro closures.

As a beginner, you should go with more neutral shoes as they tend to be the most comfortable and least expensive. Downturned, aggressive shoes are tight, uncomfortable, and typically reserved for more technical terrain. When you are just getting started, comfort is key as you get used to wearing these new shoes. Climbing shoes should be snug, but not so tight that they cause pain. Due to the fit, you should not walk in the shoes or wear them if you are not climbing.

Some examples of beginner rock climbing shoes include:

Black Diamond Momentum, La Sportiva Tarantulace, Mad Rock Drifter

Rock Climbing Harness

Just like climbing shoes, a harness is an essential piece of protective rock climbing gear for any rock climbing with ropes. All harnesses come with basic features of holes for your waist and legs, gear loops, and a belay loop. There are many differences between harnesses such as adjustable leg loops, weight, material, and fit. These features become more important if you choose to specialize in a style of climbing down the road.

For a beginner rock climbing harness, look for an “all-around” harness that is comfortable and affordable. Fit will be one of the most important factors when buying your first harness. Make sure it has a snug fit around your upper legs and waist. Some people prefer the ease of non-adjustable leg loops but if you are looking to get used to the fit and feel of a harness, the ability to adjust your leg loops can be helpful.

Some examples of all-around rock climbing harnesses include:

Black Diamond Momentum, CAMP Energy, Petzl LUNA 

Chalk & Chalk Bag

Whether bouldering or top-rope climbing, chalk can be a game changer while climbing, especially if it is hot or humid. Chalk comes in a variety of forms: block, loose, and liquid. An easy way to start is by purchasing a “chalk ball,” which is a small cloth pouch filled with loose chalk. You chalk up simply by grabbing the chalk ball and easily refill the ball when it gets low with separately purchased loose chalk. 

It’s not a great idea to just dump loose chalk into your bag without a ball, and in fact prohibited at some gyms, as it is messy, wasteful, and annoying for your belayer to have chalk dropped on them when you use it mid-climb. Liquid chalk is preferred by some but not as common for top-rope climbing. Also, “eco” chalks, most often reserved for outdoor climbing, vary in color to match the rock.

Most chalk bags are pretty small with a closure mechanism and a waist loop. A bouldering-specific chalk bag or “buckets” will be larger, without a waist strap, and often come with a brush. If you are new to climbing, an affordable waist belt chalk bag with a chalk ball inside should be all you need. Chalk bags come in all sorts of colors, designs, patterns, and shapes so have fun. You can’t go wrong with this piece of rock climbing gear!

Belay Device

If you want to rope climb, belaying will be necessary. You will need a locking carabiner and a belay device. Again, there is a multitude of devices to choose from. Belay devices often come in the following broad categories: tube style, semi-assisted braking, auto-locking, and figure 8 (not commonly used). The most traditional and entry-level option is a “tube style” device such as an ATC. Most climbers learn to belay with an ATC and then switch to an assisted or auto-braking device. No matter which device you choose, be sure to seek instruction on how to use the device safely and appropriately.

Some examples of common belay devices:

Black Diamond ATC- XP, Edelrid Mega Jul, Petzl GRIGRI

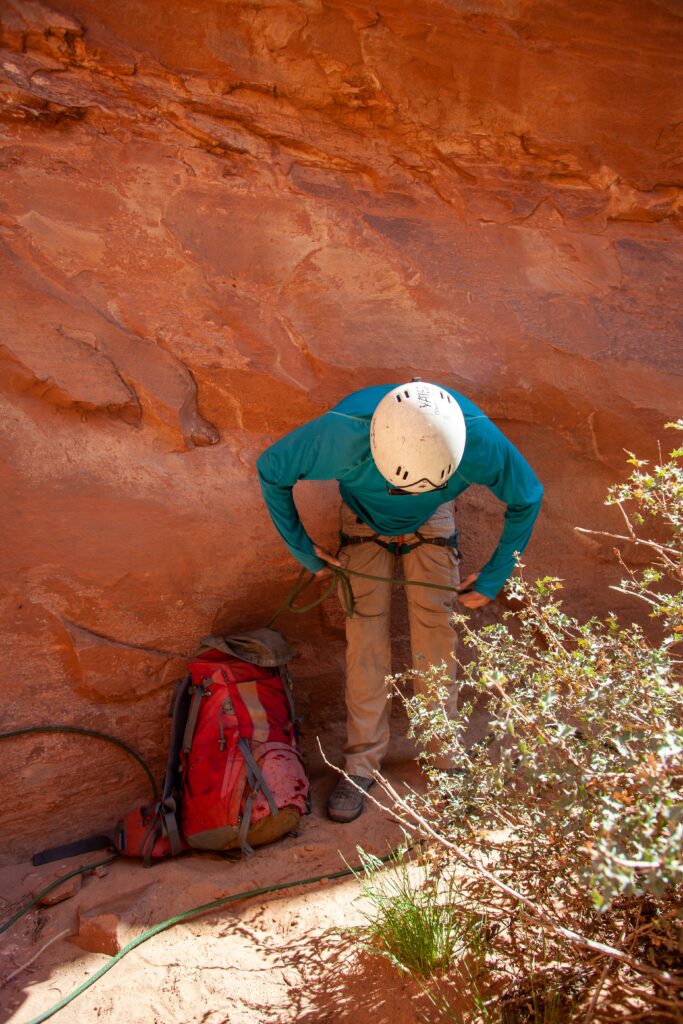
Helmets for Outdoor Rock Climbing

While helmets are not commonly used inside, they are a must-have piece of rock climbing gear for any outdoor climbing. This important piece of gear protects you from anything that may fall from above – or protect you from the ground in the event that you fall. You will want to look for a designated rock climbing helmet as they are designed to protect your head from specific injuries that could be encountered in the sport.

There are generally two types: hard shell and shell-foamed helmets. Hardshell helmets are generally more affordable and more durable, making them great for beginners. Shelled foam helmets tend to be more expensive and have less longevity but are more breathable and lightweight. As with most types of gear, fit and comfort are top priorities when selecting your gear. 

Some examples of rock climbing helmets include:

Black Diamond Half Dome, CAMP Armor, Petzel BOREO

Final Thoughts

There is so much more to know about the sport of climbing aside from the rock climbing gear, but it is all worth it to take the time and learn. Rock climbing is one of the most invigorating and satisfying challenges. For an introductory experience, try a guided rock climbing tour. Once you have your own rock climbing gear, the technique and knowledge, and some confidence, be sure to check out the best beginner rock climbing in Colorado Springs and enjoy the views from new heights!

National Parks Near Colorado Springs

Colorado Springs is full of beautiful destinations to explore, such as Garden of the Gods or Pikes Peak. But one of the most common questions visitors ask is, are there any National Parks near Colorado Springs as well? The answer is yes! Colorado has many phenomenal national parks, and several are within easy driving distance of Colorado Springs. So, let’s take a look at what these parks are, what they offer, and how to get there.

Additionally, there are several fascinating national historical sites and monuments near Colorado Springs. Therefore, we’ll also cover these destinations and what they offer.

Photo by Wallace Bentt on Unsplash

National Parks Near Colorado Springs

Great Sand Dunes National Park

Distance: ~90 miles southwest (2.5-hour drive)

Only 90 miles from Colorado Springs is the breathtaking Great Sand Dunes National Park. Boasting the tallest dunes in North America, with the stunning Rocky Mountains as a backdrop, this park offers spectacular views that you won’t find anywhere else. Be sure to try sandboarding or sand sledding if you visit! There are also many fascinating and scenic hikes in the area, but be sure to follow the Park Service’s recommendations for a safe hike.

Rocky Mountain National Park

Distance: ~120 miles north (3-hour drive)

Heading north from Colorado Springs and passing the big city of Denver, you’ll encounter Rocky Mountain National Park. This massive park encompasses about 415 square miles and features everything the rocky mountain range has to offer. From rugged peaks to lush meadows and icy alpine lakes to cascading waterfalls, there’s plenty to do and see in this park. Naturally, hiking is one of the primary attractions for this national park, along with multi-day backpacking trips. But don’t worry, there are certainly activities for everyone in this massive park – including RVing, horseback riding, and wildlife viewing.

Black Canyon of the Gunnison National Park

Distance: ~225 miles (4.5-hour drive)

Often overshadowed by Rocky Mountain or Arches National Parks, the Black Canyon of the Gunnison National Park is an underappreciated marvel. This park features a river-carved rock canyon with some of North America’s steepest cliffs. The rock itself is also fascinating, and geology aficionados will love the two million-year-old formations and spires that make up this park. What’s more, it’s one of the national parks near Colorado Springs that’s within a day’s drive.

However, keep in mind that Black Canyon of the Gunnison National Park is very remote. Research your last opportunity for gas and services, and be sure to take everything you need with you for your visit. But the benefit of this remoteness is that you won’t have to jostle with massive crowds at this park.

Mesa Verde National Park

Distance: 336 miles (6-hour drive)

Tucked away in the southwestern corner of Colorado lies this incredible testament to the Pueblo People’s culture and history. For centuries, these peoples built stunning villages in the cliffs and mesas of this area, and these ancient structures are now included in Mesa Verde National Park. This World Heritage Site offers a very unique look into how the Pueblo People lived and what happened to them as the Spanish encroached northward from modern-day Mexico and, afterward, the American frontiersmen westward.

Don’t forget to also stop by Hovenweep National Monument, just North of Mesa Verde, which we will discuss next.

Photo by Lauren Lopes on Unsplash

National Monuments and Historical Sites

Hovenweep National Monument

Distance: ~400 miles (7-hour drive)

Located just northwest of Mesa Verde National Park, Hovenweep offers another rare glimpse into the history of the native American peoples. This series of 6 villages was built sometime between 1200 and 1300 (hundreds of years before the first Europeans arrived in the area) and feature stunning architectural achievements and structures built into the canyons. Modern historians believe that around 2,500 people once lived in these villages, and their construction skill is genuinely something to behold.

Also directly adjacent to Hovenweep is the Canyons of the Ancients National Monument. This sprawling landscape contains the highest concentration of Native American archaeological sites in the country. Experts estimate that the area has been inhabited for over 10,000 years and includes more than 30,000 documented historical sites.

Bent’s Old Fort National Historic Site

Distance: ~115 miles (2-hour drive)

For the history buffs out there, Bent’s Old Fort is a must-see and is close enough for a day trip from Colorado Springs. The Site features a reconstructed adobe trading post from the 1840s period. Complete with tours, demonstrations, and historical recreations and performances, this is a definite stopping point for folks interested in western frontier history.

Sand Creek Massacre National Historic Site

Distance: ~143 miles (2.5-hour drive)

The western frontier history is full of conflict, culture, and controversy. All of this, and more, is preserved at the Sand Creek Massacre National Historic Site, which memorializes the terrible events that occurred on November 29th, 1864, when U.S. cavalrymen attacked the villages of White Antelope, Left Hand, and Black Kettle – leaders of the Cheyenne and Arapaho people. Today, this site offers informative ranger talks that discuss the awful events of that day and their significant impact on the region’s history.


Photo by Himiway Bikes on Unsplash

Final Thoughts

Colorado has so much to offer with its plethora of National Parks, Monuments, and Historical Sites. With almost any outdoor activity imaginable, from boating to hiking, plus its wealth of history, everyone is sure to enjoy a trip here. Best of all, there are several National Parks near Colorado Springs in addition to historical sites, making it an ideal location to visit as a springboard to your greater Colorado adventures.

And don’t forget that Colorado Springs itself offers several fantastic outdoor destinations of its own. Our hiking tours are an easy option to check out the best areas. But if you prefer to explore alone, don’t forget to consult a trail guide for Colorado Springs!

E-Bike Classes – What to Know

Did you know that there are different laws that apply to the various classes of electric bikes? Did you know that e-bikes are now grouped into three classes? Depending on what state you live in and what type of e-bike you have, you may have to follow one rule or another in order to avoid a citation. We’ll help you figure out your e-bike’s class and understand what important rules apply to your riding.

What’s Going on with E-Bike Classes?

When e-bikes first became popular, there were no laws governing how they could be used. What speed limit should apply? Can you ride an e-bike in designated bike-only spaces? Some states applied laws to e-bikes as if they were mopeds or other motor vehicles, enacting confusing licensing and equipment regulations that made no sense.


In 2015, California adopted a 3-Class approach to regulating e-bike use, where different laws apply based on the type of e-bike. So far 35 other states have followed suit with this standardized PeopleForBikes model law. The remaining states have laws regulating e-bikes as well, with some considering e-bikes to be motor vehicles and some regulating them as bicycles.

Photo by Himiway Bikes on Unsplash

A Primer on E-Bike Mechanics

Before we get into the specific classes of e-bikes, there are a couple of quick details about e-bikes you need to know. The point of an electric bicycle is that it uses a motor to turn the bike wheels so you don’t have to pedal, either as hard or at all. There are two ways that e-bikes can achieve this: pedal assistance and throttle. 

Pedal assistance means that the bike monitors the level of work you are putting in and responds in kind by providing power to the motor. This allows you to get further and go faster without as much work as a traditional bicycle. However, the motor will not turn on or stay on if you are not pedaling. 

In contrast, a throttle allows the e-bike motor to turn on even if you are not pedaling. Typically located on the handlebar, this device is similar to an electric scooter or a motorcycle. This distinction is important for the different classes of e-bikes, and you will see why below.  

What Are the Three E-Bike Classes?

The three classes of e-bikes are very straightforward, and it will not be hard for you to figure out which type of e-bike you own. You can either review these descriptions or do a quick search in your e-bike’s user manual. 

Class 1

Class 1 e-bikes provide only pedal assistance. This assistance stops once the bike has reached 20 miles per hour (mph). These are most likely to be regulated like traditional bicycles, as they have the lowest capability. Without a throttle, the user must keep pedaling in order to activate the motor and continue getting assistance. Keep in mind, though, as with all classes of e-bikes, it is possible to exceed the 20 mph limit by pedaling or when going down a hill.

Class 2

Class 2 e-bikes have a throttle-operated motor. This makes it possible to ride without pedaling at all. Similar to Class 1 e-bikes, the motor stops providing assistance at 20 mph; however, you can still pedal to achieve higher speeds.

Class 3

Similar to Class 1 e-bikes, Class 3 e-bikes provide pedal assistance. But unlike other classes, they have a pedal assistance limit of 28 mph. Depending on the state, some Class 3 e-bikes also are allowed to have a throttle (usable up to 20 mph), whereas some states ban Class 3 throttles altogether. 

If you are not sure which class your e-bike fits in, you can easily find out with a quick Google search of your e-bike brand and model or by reading over your bike’s user manual. Once you know what type of e-bike you have, you can move on to learning more about the specific rules governing your e-bike usage.

Photo by Himiway Bikes on Unsplash

What Are the Rules for the Three E-bike Classes?

We will go over the model laws provided by PeopleForBikes since this has been widely accepted and applies to two-thirds of states. However, these will only give you an idea of the main regulations since many states have additional laws on top of these. Therefore, regardless of where you live, double-check your state and local laws. Also keep an eye out for additional regulations for, say, biking in your neighborhood parks. 

The major issues that the e-bike regulations cover relate to access (to bike lanes, parks, etc) and usage (wearing helmets, age restrictions, etc). Some states have further restrictions on the classes of e-bikes. For example, California does not allow Class 3 e-bikes to have throttles. Meanwhile, Colorado and Washington do not allow e-bikes to have electric motors above 750 watts, effectively limiting speed. You should learn more about the restrictions in your state before investing in an e-bike of your own.

Class 1

Generally closest to traditional bicycles, Class 1 e-bikes have the fewest restrictions. They typically can be ridden wherever traditional bikes are allowed. This includes bike lanes on roads and bike paths in parks. Most states do not have regulations for Class 1 riders specifically, though people under 16 are required in many states to wear helmets while riding any class of bicycle or electric bike.

Class 2

Class 2 e-bikes are typically regulated the same as Class 1 e-bikes. However, some states have more regulations because of the addition of the throttle. This is a safety issue because the throttle can continue to power the motor without user input, making it more dangerous for riders and passersby alike. Regarding usage on mountain biking trails, for example, Class 2 e-bikes may be banned altogether from singletrack and downhill-only mountain biking trails. 

Class 3

The most highly regulated, Class 3 e-bikes are generally not allowed on bike trails or multi-use trails. This is another safety concern because of the maximum pedal assistance speed of 28 mph, which has been deemed too fast for multi-use trails in many states. Most states do allow Class 3 e-bikes to be used on roads and trails open to motorized public use (for ATVs and other off-road vehicles). 

Photo by Himiway Bikes on Unsplash

State-Specific Restrictions

Some states also restrict Class 3 e-bike riders to people over 16 years old and require all users, regardless of age, to wear helmets on these e-bikes. You should consult your state and local laws to make sure you do not unknowingly break any that apply to your class of e-bike.

You can find your state’s guidelines by searching your state government website for e-bike regulations. Keep in mind that almost every state gives local governments the authority to add restrictions if they want. So don’t forget to check the guidelines for your city or town. Finally, if you are planning an e-biking trip to a park or forest, you should look up the trail guidelines before you go. 

Rules of the Road

No matter what state you live in or what class of e-bike you have, there are certain common courtesies and best practices you should follow. First and foremost, please always wear a helmet when riding a bicycle or e-bike of any class. Even if it is not a legal requirement, it is a minimal effort that can save your life in the event of a crash. 

E-bike riders should also keep in mind that speed limits and other driving laws still apply to them. If you are riding on a road, say in a residential area, there is a good chance your e-bike has the ability to exceed the posted speed limit. Despite being on an electric bicycle, it is possible to get a speeding ticket, citation, or fine, so obey the law. 

The Sidewalk Question

Bicyclists should avoid biking on sidewalks, as it is dangerous to pedestrians. Instead, use designated bike lanes where available or share the road with cars where legal. When riding an e-bike on a road, be sure to behave like a car and follow the rules of traffic. Stop at stop signs and red lights, and always give pedestrians in the crosswalk the right of way. This is especially true for e-bikes as they can go faster than traditional bicycles and therefore cause more potential injury in a collision.

Right of way is an important rule to know as an e-bike rider. What’s more, this rule applies to both the road and the trail. On multi-use trails, bicyclists must yield to hikers and people on horseback. As horses and other pack animals can get startled by the noises e-bikes make, it is important to give them space and let them pass you before continuing your ride. Finally, downhill riders should yield to uphill riders (since pedaling uphill is obviously harder).

Final Thoughts

Once you know all the state and local rules for your particular e-bike class, you can enjoy your ride, and rest assured that you will not violate any obscure laws. E-biking is a fun and effective way to commute to work, conquer a longer ride, or summit a steeper trail. If you are considering buying an e-bike and wondering if e-bikes are worth it, there are certainly many advantages to consider. You can also take a test ride on an exciting e-bike tour near Colorado Springs to learn more about the techniques and rules for riding an electric bike.

Tips for Hiking in Rain

Are you headed out for a hike and worried about the weather? It’s important to always be prepared for any conditions, so we’ve got some tips for hiking in rain. First, make sure you know how to pack for a day hike in general, and then we’ll discuss specific gear for hiking in rain and other considerations for staying safe and dry.

Image by Drew Tadd from Pixabay 

Do Your Research

First things first, always check weather reports before you head out. There is a difference between a drizzle and a thunderstorm, both in terms of comfort and safety. If there are severe weather warnings or if your hike includes a potential flashflood area like a canyon, consider postponing your trip. Either way, be sure to tell a friend about your planned whereabouts in case the weather becomes hazardous. Lastly, pack the ten essentials to be prepared for every situation.

Pack a Hot Drink

When packing for a day hike, you should always bring plenty of water and snacks. When packing for a rainy day hike, you may want to add a nice warm beverage to the mix. You can prepare a thermos ahead of time and leave it in the car for when you finish the hike. If you are backpacking for a couple of days, drink mixes like hot cocoa can be a real treat to warm you up. 

Wear the Right Rain Gear

As is best practice for every hiking trip, you should wear moisture-wicking inner layers. Dry-fit shirts and wool socks will keep you dry even when you sweat or get caught in the rain. These proper layers insulate body heat, help prevent blisters, and can be the difference between a safe rainy hike and a dangerous wet one. 

Rain Jacket

For outer layers, a waterproof rain jacket is a must. Something light that fits in a day pack is a smart choice to avoid bulk in good weather. The most important thing to note is the distinction between water-resistant and waterproof materials. A water-resistant jacket might stay dry if you spill your drink or walk through a sprinkler. However, it is not suitable for hiking in the rain. After a while, the material gets bogged down with water and can become extremely uncomfortable. To avoid being cold, wet, and miserable, a certified waterproof raincoat is an absolute necessity.

Rain Pants and Proper Footwear

Waterproof pants and hiking shoes are the two other essential pieces to stay dry on a rainy day. Waterproof boots are my go-to even on clear days. If I happen to step in a puddle or hop a small stream, my feet stay dry. The one downside with waterproof shoes is that they are not breathable. If rain does get in, it will be extremely hard to get them dry, and you will find yourself walking in puddles the rest of the day. The main concern with wet feet is blisters. When skin gets wet, it is more susceptible to breaking and forming blisters. This is why waterproof pants and shoes (that don’t have a gap at the ankle) are the best way to keep dry.

Two other helpful pieces of gear are a towel and an extra pair of socks. You may choose to leave these in the car to dry off when you return. Having a towel for wet hair and drying off wet skin is really helpful, and there is nothing as comforting as putting on warm, dry socks after a wet hike.

Photo by Andy Køgl on Unsplash

Waterproof Your Gear

Next, unless your day pack is truly waterproof, you will want to make sure the stuff inside is well protected. Your phone, cash, food, and other personal items can be kept dry by putting them in dry bags or plastic baggies. A waterproof phone case will help make sure you always have access to navigation tools and emergency services.

If you are backpacking for a couple of days, rather than just on a day hike, you will especially want to ensure your sleeping bag, clothes, and toilet paper do not get wet. One great way to keep all your gear dry at once is with garbage bags. Rather than put each item individually in small plastic bags, you can line your entire pack with a garbage bag and then pack everything like normal. As long as you secure the bag shut and get the water off before you open it, you should be able to keep your important belongings free from the rain. 

Know Safety Protocols

There are a few important rules to keep in mind for hiking in dangerous weather conditions. First, assume everything will be slippery. Rocks, wooden steps, mossy tree roots: everything is easy to slip on when wet. Be sure to keep your eyes on the trail and tread carefully.

If you find yourself caught in a thunderstorm, seek shelter, head to lower elevation, avoid the tallest trees, and avoid open meadows. If you are with a group, you should spread out to reduce the number of injuries in the event that there is a lightening strike.

Finally, if you were planning on crossing a stream on your hike, remember that it will be larger in the rain. You should always have an established path with branches or rocks to hold onto for safety. Added water means added current, so be extra careful not to get your feet swept out from under you. Check the National Park Serivce advice for river crossings for more information.

Dry Out After a Wet Hike

If you head home after your day of hiking in the rain, you can throw your clothes right in the wash. If you’re out for a couple of days, hang everything to dry. Put your hiking shoes in the sun or near a fire (not too close!). It is easy for mold to develop in gear that does not dry properly, so dry out your boots to extend their life. 

Photo by Yann Allegre on Unsplash

Consider a Guided Hike

One great way to avoid the hassle and confusion of preparing for hiking in the rain is to book a guided hike. You can learn so much from professional hiking guides on how to prepare and navigate a rainy hike, and you’ll also benefit from someone bringing along those essential first aid supplies.

If you are feeling dispirited that the rain ruined your hiking trip, know that it is very possible to have a great time in any weather. With a little preparation and the right gear for hiking in rain, you can ensure a comfortable experience with Mother Nature’s wetter side. Be sure to check out the Colorado Springs trail guide to find your next great adventure, and enjoy your time outdoors!